
Premise
This article is about using pencils to draw for a beginner with 5 steps to start drawing.
- Step 1: Practice 2 ways to hold pencil.
- Step 2: Changing your eye level to find the right view to draw.
- Step 3: Reduce and relocate objects.
- Step 4: Measure and sketch the size.
- Step 5: Shades and texture.
YOU WILL NEED
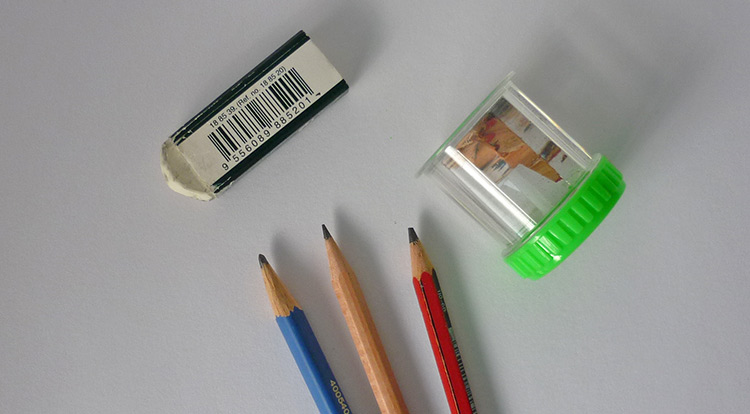
Pencil of graphite grading scale is just a suggestion below, please use it according to your personal preferences or existing materials.
- Drawing paper
- One HB pencil
- One 2B pencil
- One 6B pencil
- One eraser
- A pencil sharpener
Practice
To be an excellent artist, it’s probably not easy for everyone, but everyone should be able to enjoy the art and develop their talents. As the Queensland art gallery is open for everyone to draw and enjoy time there, also there are lots of art works to learn and see, and it’s totally free. Therefore, you just need to follow the article with the 5 steps to guide you.
However, if you are a seasoned artist, you are welcome to offer us more info to improve the content or write other articles to support us.
Step 1: Practice 2 ways to hold pencil
When you are drawing a picture, there are 2 good ways to hold the pencil. Try not hold a pencil vertically, you won’t be able to draw a smooth curve.
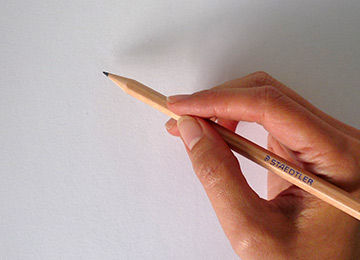
Hold the pencil on 45 degrees
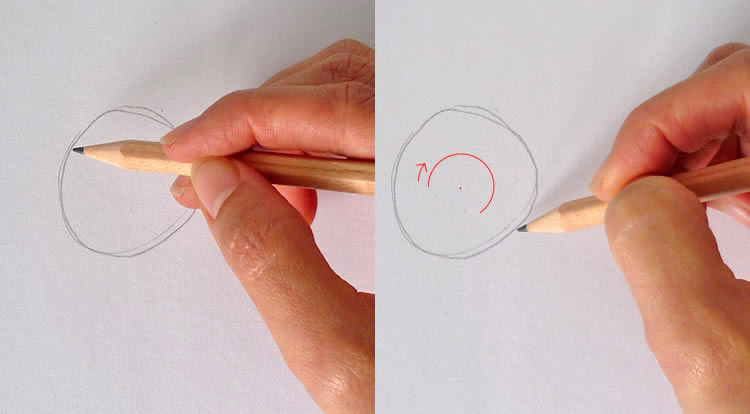
The first way is to hold a pencil at 45 degrees, about 5 cm from the end with index finger and thumb. When you are using this way to hold a pencil, your wrist will be able to move well and turn to make the drawing quite clear and easy. Normally we use this way to draw shapes and sketch a structure of a picture.
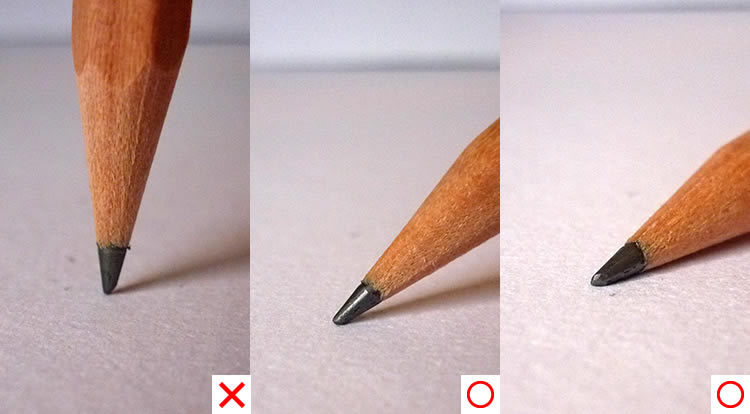
Practice 1-1: Draw lines, curves and a circle.
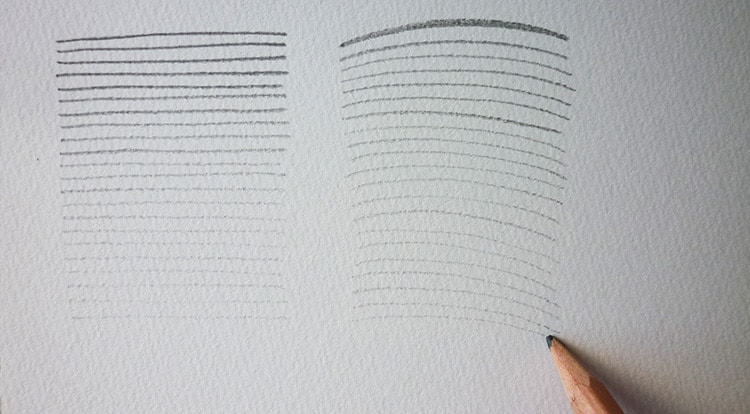
Let us start drawing, use the first way to draw lines and curves as in picture-3, use HB pencil to draw it a couple of times. After that, switch to a 2B pencil to draw, see how you can draw each line or curve with equal thickness.
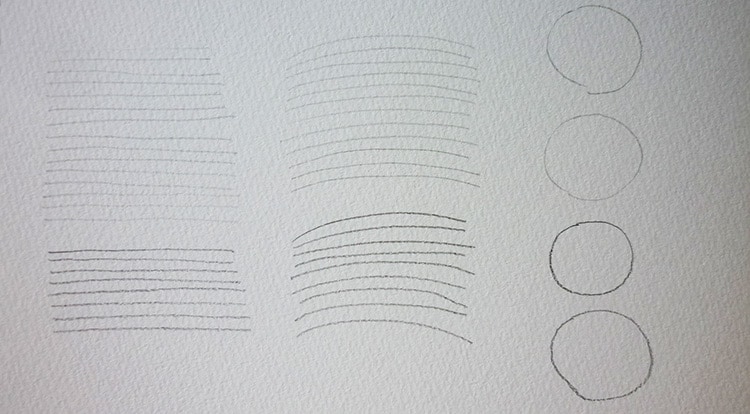
Next draw a circle in this way, your wrist is able to move loosely while you are turning for a circle shape as a clock in a different direction. Draw a couple of times to make the circle till round.
Practice 1-2: Drawing shading in the first way
Use the first way to draw the lines and curves, make it go smoothly and equally. Practice drawing fading away from darker lines to softer lines.
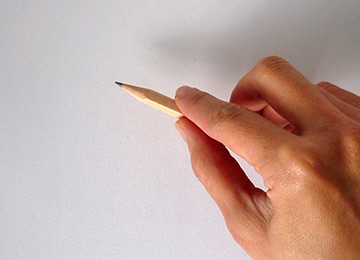
Hold a pencil on the side
The second way to hold a pencil is inside your palm, it is easier to get a thick area when you draw each time, also the drawing looks like it has no lines.
Practice 1-3: Draw shading area in second holding way
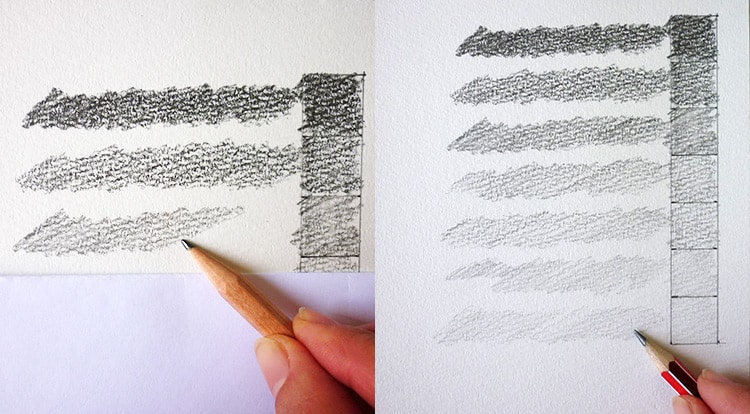
Use the second way to hold a pencil on the side to draw a shading area. Firstly, let us prepare a chart to draw the darkest to lightest tone as in picture-7 left hand side. This first and second block, are using 6B pencil to fill in the darkest and second dark tone. After that, switch to the 2B pencil to fill in darker to less darker tone. Finally, switch to HB pencil to fill in light and lightest tone.
Once you have the reference of fading away chart, get another paper to cover other tone, only focus on one pale tone each time. As such, you are able to draw each pale tone evenly dark or light as the reference chart.
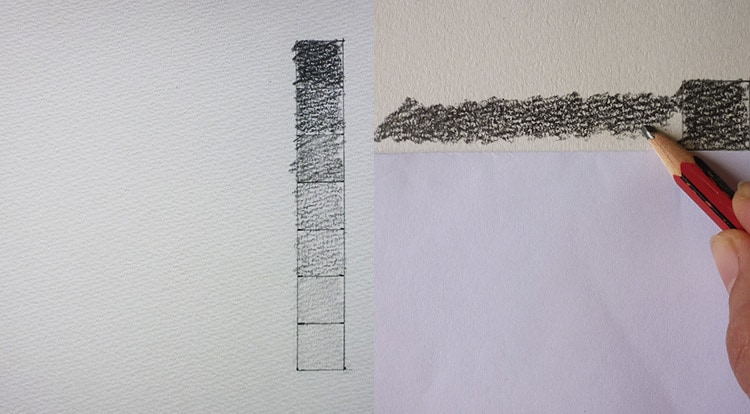
When you draw each pale tone, try to control the pressure equally with your pencil. Let it look like the same tone at the same level.
Practice 1-4: Draw a simple object
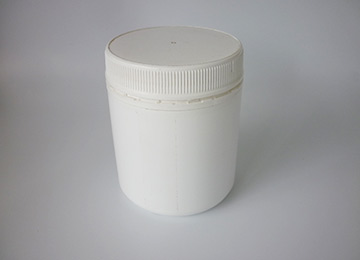
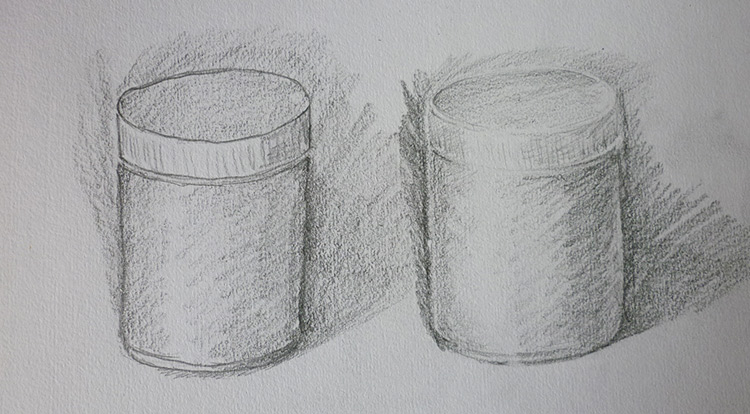
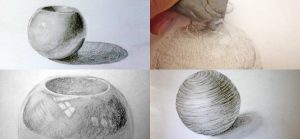
For quite a while, we had practiced drawing lines and pale tone. Its’s the time to let us start drawing a simple object. Here is an example, we draw a cylinder container or any other simple 3D object.
We start drawing outlines with light sketch edges lightly, keep the highlight area of the object with no lines. However, some people might like to draw the outline with a strong amount of pressure on your pencil that gives a very dark outline on the object. If you would like to try a different way to draw a picture, this will be good to go.
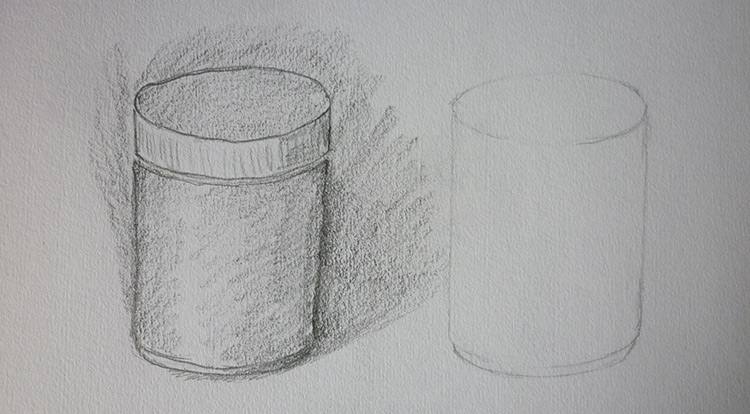
We draw the shade area first, and tone it at core shadow (see picture-37 tell you what is the core shadow ). It’s an option for drawing this with a background.
When you have sketched the correct shape, you are able to draw the mid tones and core shadow (see picture-37) darkly or draw the background to feature the edge of the object without drawing the outline of object.
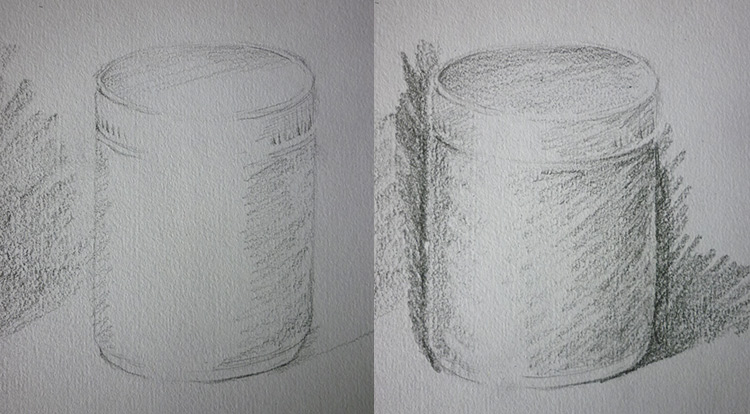
Compare the left hand side with a thick outline cylinder and the right hand side one. See which way is more easy to tone the shade and light in pencil. Try to develop your own drawing process, as long as it looks good that is the right way for you.
Step 2: Changing your eye level to find the right view to draw
Changing your eye level
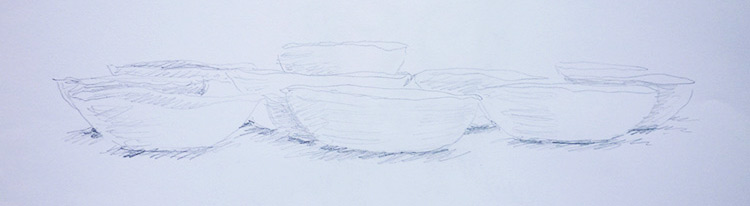
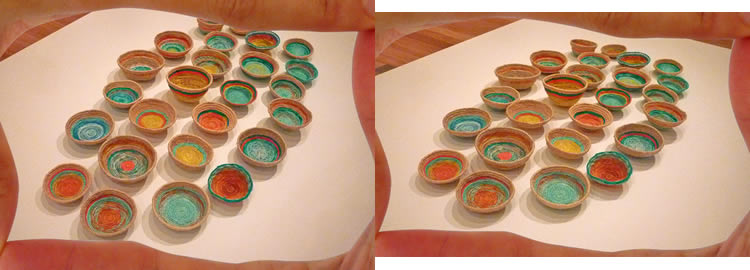
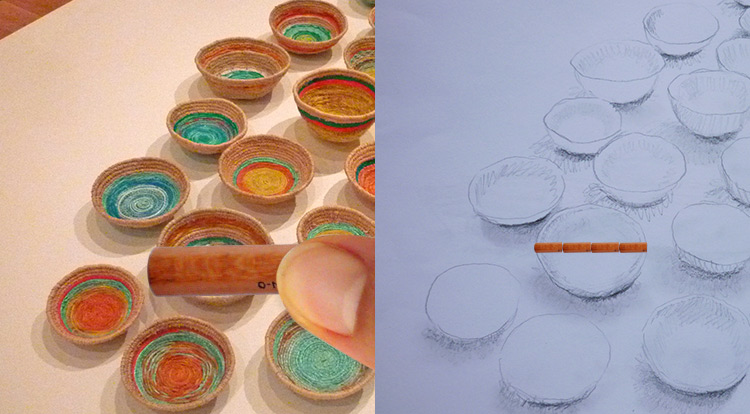
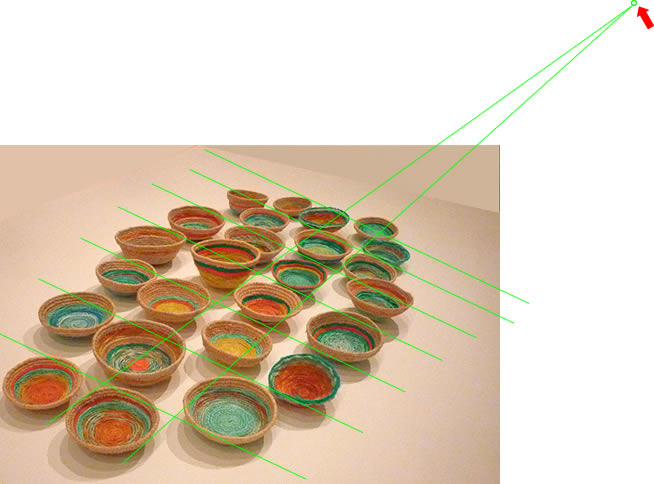
When you start drawing, the first thing you need to understand is how to find the best view to see the main objects that are you going to draw. It means you should present them in the most interesting view. For instance, we have these bowls below, from the horizontal side level, you can only see the different heights and a little bit of width of bowls changing.

This is the narrowest height from the objects that you are able to present. From this eye level, probably it is not good to describes all the details of the bowls too.
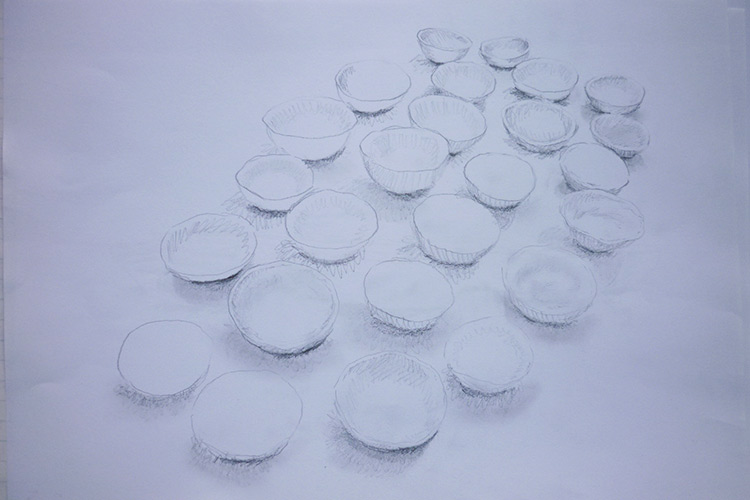
If we move our eye level to the top view, it can’t be good either, as you can’t see the different heights of the bowls as well. Try a middle point of view, change your eye level to 45 degrees from the top view, then you are able to see the eye level between top view and side view.

The benefits of eye level 45 degrees from the top view:
1. See all the different diameters, also see the bowls’ circle shapes are changing to oval shape. Because the perspective view is different for each bowl, it makes the top of the bowl curves are all looking different. See tips to find out more perspective drawing.
2. It gives better depth and size different perspective.
3. Different heights of bowls are still able to be presented well.
Practice 2-1: Draw a 45 degrees top view
Draw a 45 degrees top view, and make the bowls’ top curves are variety, see how they are changing from circle shape to oval shape, also see how can you find the vanishing point from this practice.
Horizontal view
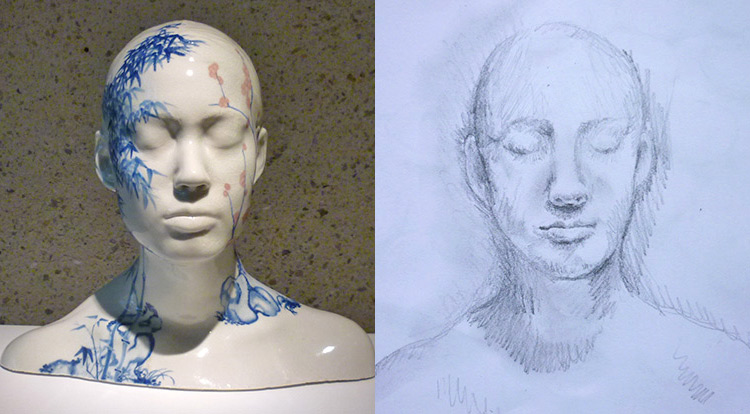
Most of the time we use a horizontal view to draw a portrait. This is the same view we talk to most people with. If they are talking and changing expression, it’s a good view to catch all the details.
Top view
If you put your eye level higher than the bust, you are able to see the full back of the head shape, the curves of the side face and chin, and shoulders to back curve. The point is that the bust has less expression, you are the creator to give the viewer a good feeling, to make a good atmosphere to present this bust. From the top view to see the bust, you might feel she is silent, young and humble?
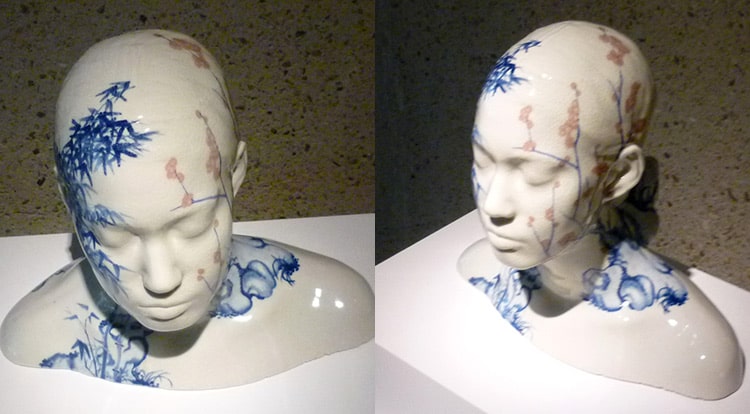
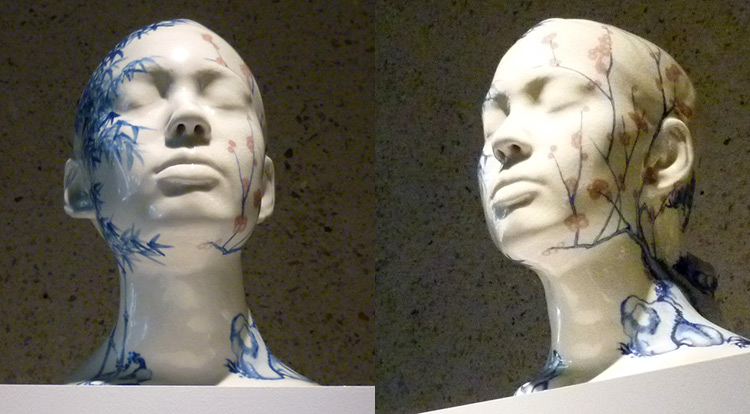
Looking up view
If you move your eye level lower than the bust, you are able to see more curve from her nose, lips, forehead, ears, chin and the hair at her back. From the look up view of the the bust, you might feel she is confident, tall, mature and strict?
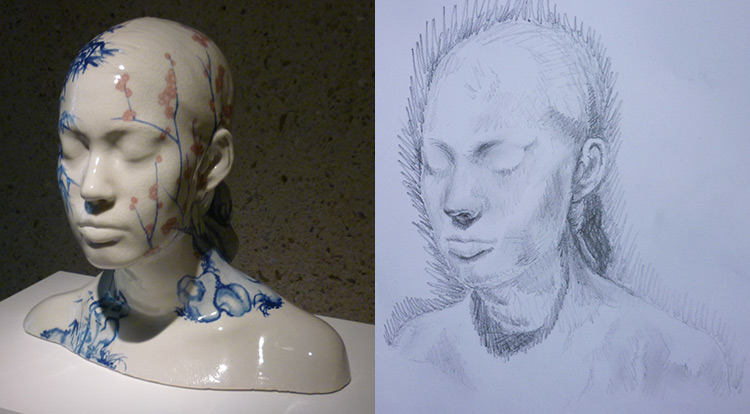
Practice 2-2: Draw a 15 degrees top view
At this point, you know the different eye level will give the viewer different feelings when looking at the bust. While we are creating a picture, we should always consider in our painting good eye levels. Try a 15 degrees top view and practice drawing a picture, ask yourself and other people, how do you feel about the bust from this view.
Find the right view
All pictures are bounded by the picture paper size, so when we start creating an art work, we need to consider how you would like to bound the view? How to present between the main objects to the edges? From which eye level is the best perspective view to see the main object.
For finding a good view, we need a picture frame. We need to identify how to present our art work at that range. Let me tell you a way which always helps me a lot when I start drawing. It’s your hands, you just need to open thumb and index finger. Straighten both fingers at 90 degrees, then use your both hands to form as a picture frame. When you are checking the view, just open one eye and look through your hands simulating a picture frame to check the view.

The picture frame is to help you bound the field that you are going to draw on the paper, don’t make too much unnecessary white space.
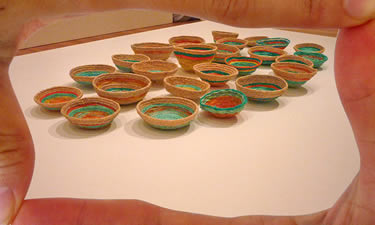
Use your hands simulating a picture frame to see if you would like to cut off some objects from your drawing to make the picture fill up the paper? As a choice, you would like to keep a little bit white space between objects to the boundary.
Practice 2-3: Practice eye levels and find the right view
Find a 3D object from the art gallery, then use all eye levels which you have learned from above. See what different feelings you are able to get from the different perspective views, enjoy your adventure time here.
Step 3: Reduce and relocate objects
Reduce objects
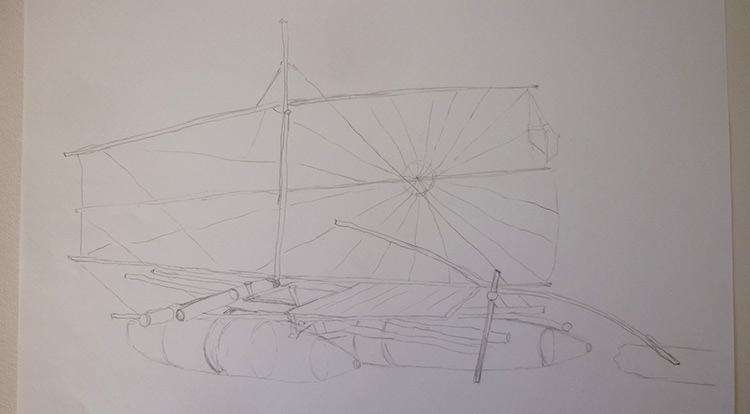
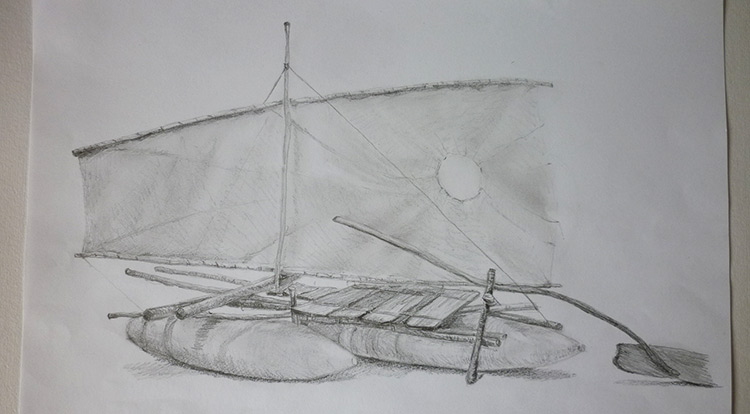
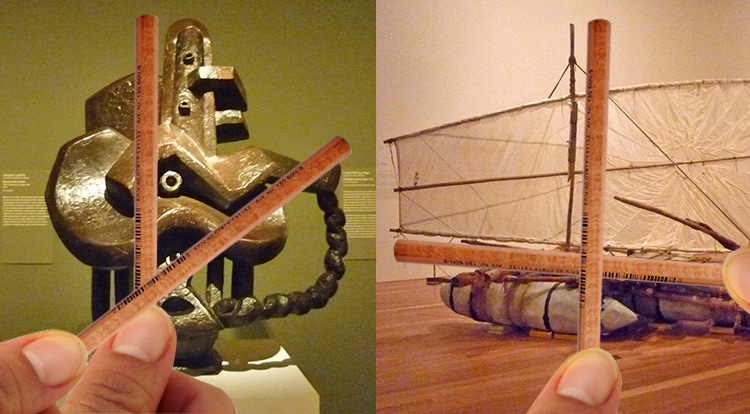
This boat was very attractive to me in the art gallery. So I decided to draw it. Unfortunately, I couldn’t finish the picture in my one hour of drawing. Because, I wanted to draw all the elements and all its details. It could be too hard for a beginner or first time drawing.
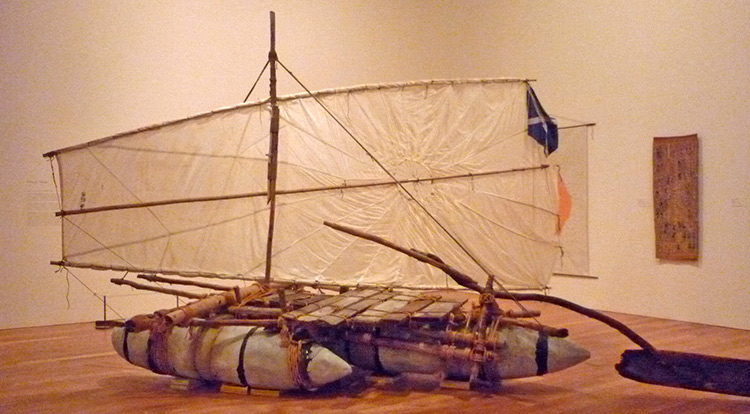
As such, I found an idea. If you had a limited time to draw a picture, or you are practicing on drawing at the beginning. We could reduce the objects from what you see. Only draw the dominant and main objects with good looking curves and shapes. For instance, on the picture-25, you can reduce some poles you can’t see well under the boat, or reduce the deck of wood. In addition to, we can reduce the details on the sail as well.
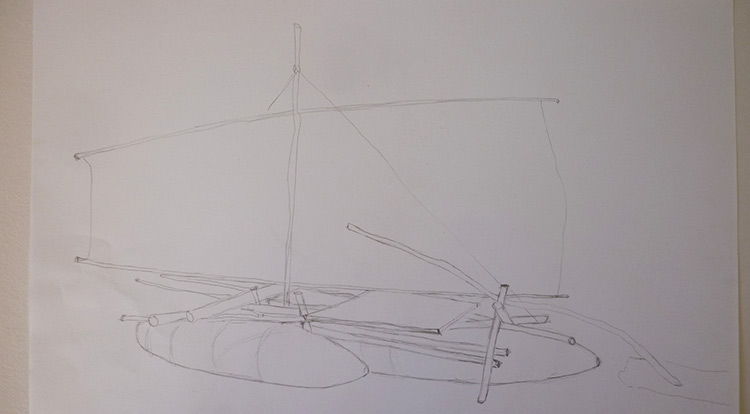
While you are sketching the structure of picture, try to get the right size and proportion of the object as much you can. For instance, cylinder curves or rectangles on the perspective view. Try to draw hidden lines of objects to help you get the right shapes. After that, if you reduce some objects from your drawing, it will still look good.
Practice 3-1: Reduce and rationalize objects
It’s your time to practice. Manage your time to spend on the details of the dominant and main objects. Reduce objects which are not easy to see from your choice of view. Try to finish your art work in time.
Relocate object
Quite a lot the time, we want to draw some scenery, but the objects are not located at the right spot which we would like to place or some object we can’t see properly. At this point, we need to create our own way to make the picture looks good and balanced.
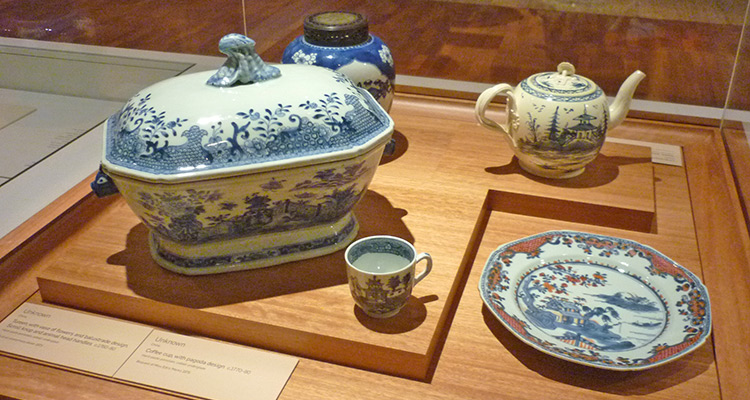
Here is an example, from Picture-28, there is a jar at the very back of picture. We can’t see its full details. As such, we can ignore it from our drawing. Also the plate at the right bottom, it looks the step will divide the plate to the rest of the objects. How about we move the plate closer and don’t draw the step. After the object relocation, we have a complete 3 objects in the same scene.
Practice 3-2: Relocate objects and balance composition
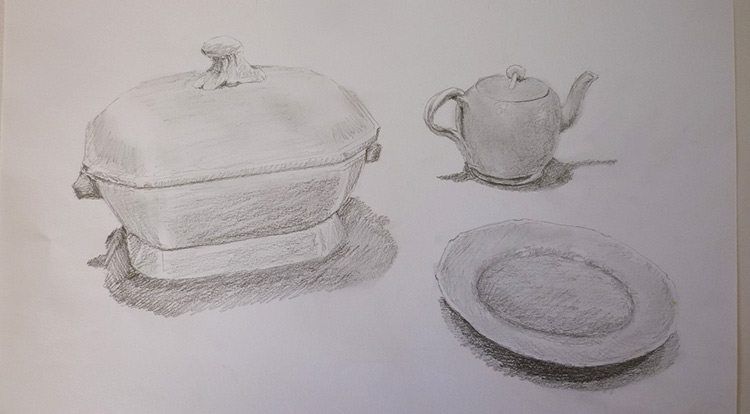
It’s the time for you to create your idea from picture-28, can you design better locations for the objects. From picture-30, it reduced the baking tray handles and relocated the cup to the front. As such, it makes the baking tray shadow have a complete shape. Try to develop your idea with relocations to make the objects look good and balance in your drawing.

Step 4: Measure and Sketch the size
Before you develop the shading and details, a very important thing is make sure your sketch shapes and proportion of objects are all correct. Therefore, we need to measure the scenery that we are drawing. The reason for measuring is because that will help to arrive at correct proportion angles and shapes, and it is also a great method of training the eye to see more realistically. In addition to helping your eye to develop the critical observation, it will solve some difficult drawing situations of proportions and objects.
Measure the picture width
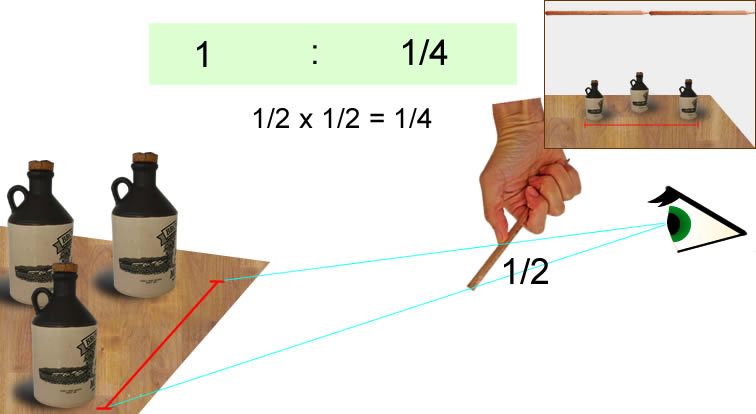
For measuring the scenery and objects, you just need to use a pencil and your thumb. Straighten your arm, only use one eye and focus on the pencil. Let your thumb be able to move up and down with the pencil. The measurement is starting from the top of the pencil till your thumb.
As in picture-31, the full length of the pencil is about 1/2 the width of your paper, then you measured the width of landscape is about 1/2 length of your pencil. As this point, from your current view point, you have the proportion 1/4 ratio of the landscape to the drawing paper.
From the other way around, we can say the width of drawing picture is 4 times smaller than the width of landscape. The pencil which you measured the width, you will need to multiply 4 for drawing on the paper.
Measure the width or height of object
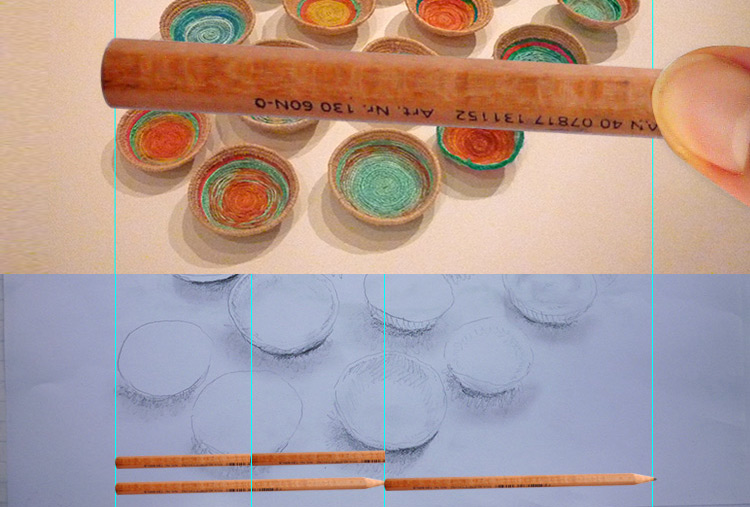
According to the same theory that we just used, we are able to measure the width of the object. Picture-33, we have lots of different bowls. If we would like to measure each ones diameter, we measure it from the landscape, then you can prepare a ruler to help you. For example, measured a width and check it from the ruler, you might get 3.5 cm. You will draw the diameter of the bowl on paper is 14 cm. Don’t forget that measured width needs to multiple by 4.
Measure the object position
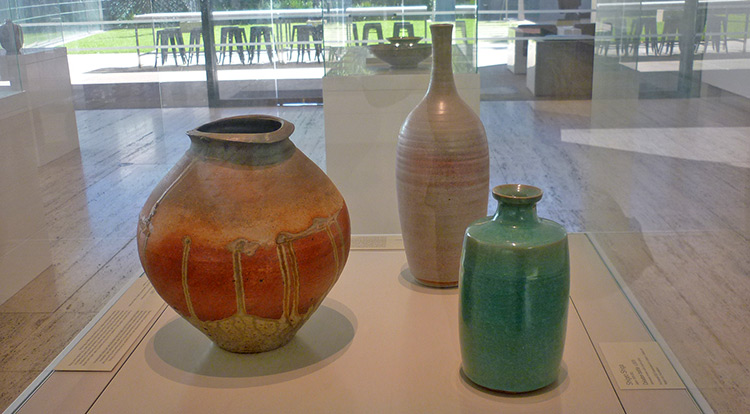
If you would like to check the relative position of the object, you are still able to use this way. According to picture-34, we have 3 different vases and pots. They present at different distances and locations from your observation point. Compare each other relative position of the object to get the correct size of the object.

Sometimes your first instinct might see something as vertical and straight, it will depend on your observation point. However, it might not be exactly straight as you though. It’s better to measure the angle before you start drawing. The same way as you used for measuring the size. Straighten your arm, one eye open and focus on the pencil. Compare the scenery and your pencil and find the right angle to draw the line or curve which you have measured.
Step 5: Shades and Texture
The intensity and angle of light really makes the atmosphere different it also gives the objects their details. This step is not talking about the light, it is about the shadow and highlights of objects. As those details on an object are caused by the light. The direction of light will affect the opposite side of object’s shadow. When we draw good shading on paper, it makes 2D drawings look 3 dimensional and real.

Understand light and shading
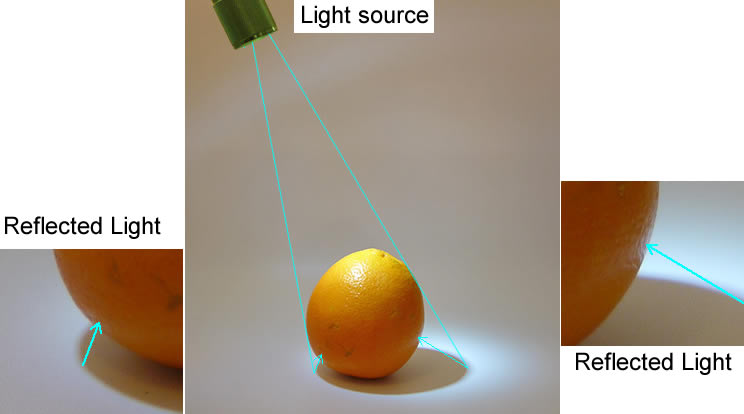
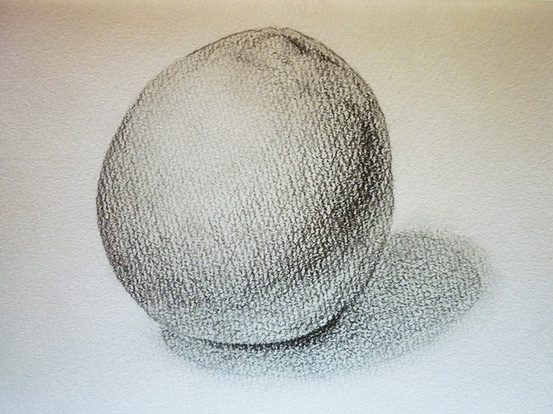
Let’s understand the details. The light source comes down from the top left, as such we are able to see the shading on an orange as in picture-37. See the names of light and shading from picture-38. Note that the Cast Shadow has been indicated on the white table. We need to know where the Reflected Light is. It travels from the light source and comes down to the white table. After that, it bounces off the table and illuminates the shadow on the side of the orange and gives a slightly bright curve, that is the Reflected Light.
If you would like to draw shades well, you will need to practice the pressure control with your pencil and draw smoothly from dark to light, or other way around. Also another important thing is to understand the light direction and different tones on an object.

At this article, we are learning the basic way to start drawing shading and light. Also try to understand the names of shadows from picture-38.
Practice 5-1: Draw shading and light
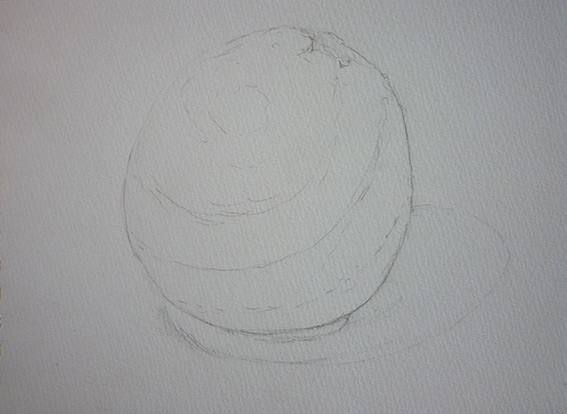
Sketch lines that divide the areas of the Core Light, the Mid Tone and the Core Shadow. Draw all possible lines you can see at this stage.
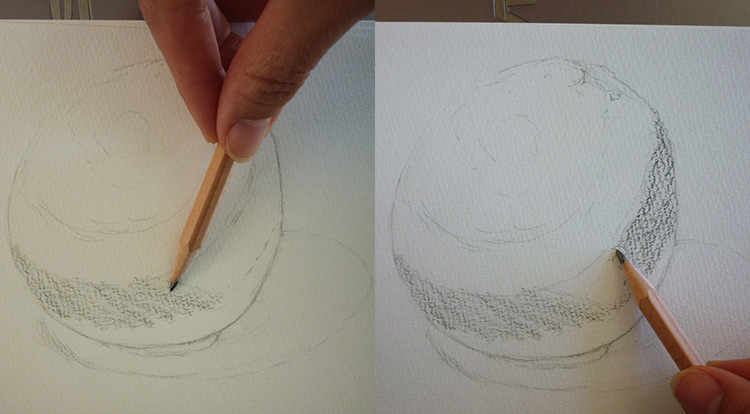
Follow the curve of the circle to tone the Core Shadow. Hold a pencil on the side and draw it at a right angle to draw shading.
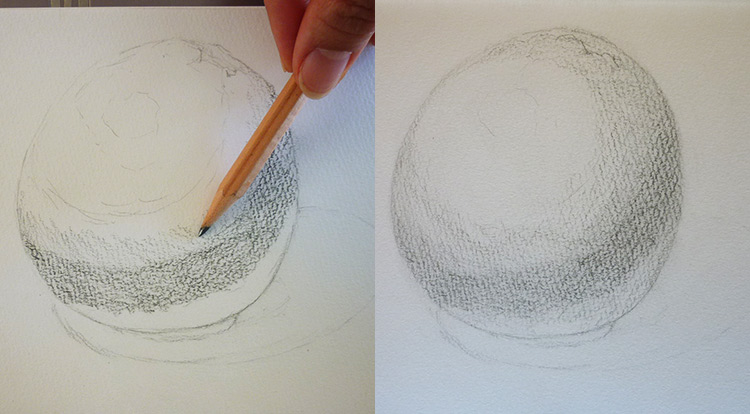
Gently tone the Mid Tone and the edge between the Core Shadow areas. The Mid Tone is the area for developing the look of a 3 dimensional sphere.
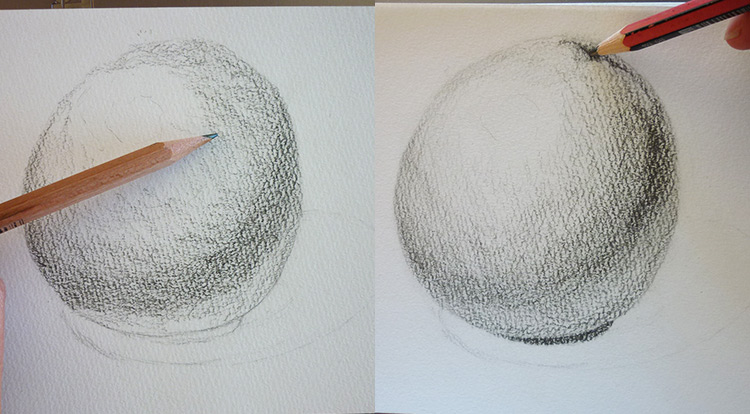
Consequently, extend the area of the Mid Tone to the Core Light, also let it connect smoothly and fade out. Tone The Mid Tone to the edge of the circle a little bit darker than the center. Extend the Core Shadow to the bottom of the orange slightly lighter, and keep the Reflected Light brighter. After that, draw the connected stem part at the top of the orange. Also tone the Occlusion Shadow as dark as you can.
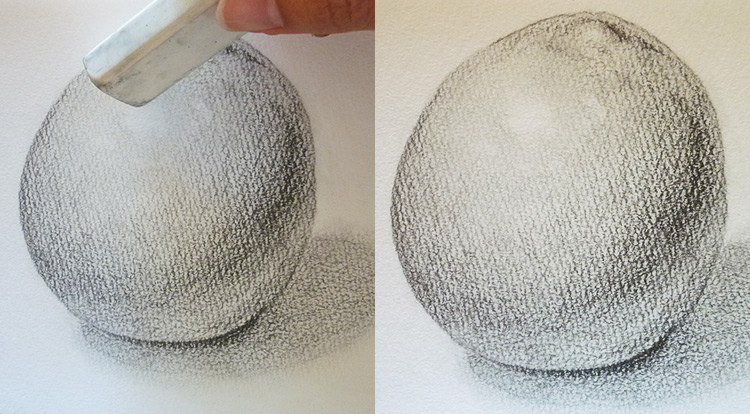
Follow the curve of a circle and use your finger to gently smudge between the Core Light to Mid Tone. Also smudge the area from the Mid Tone to the Core Shadow.
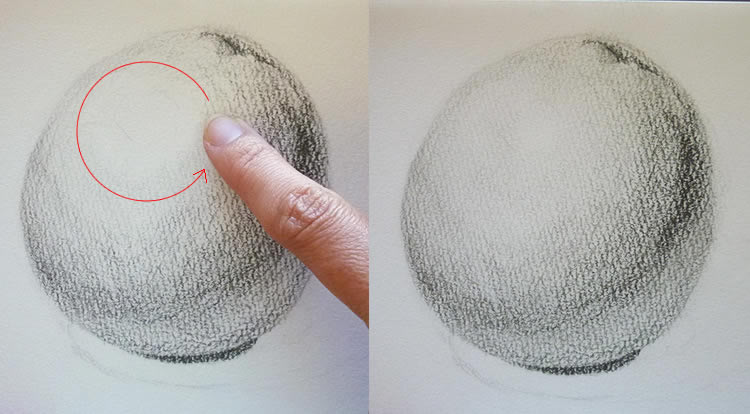
After smudged, tone gently shade back again, to make it look smooth. Also draw the Cast Shadow with radial direction from the Occlusion Shadow toward to outside edge.
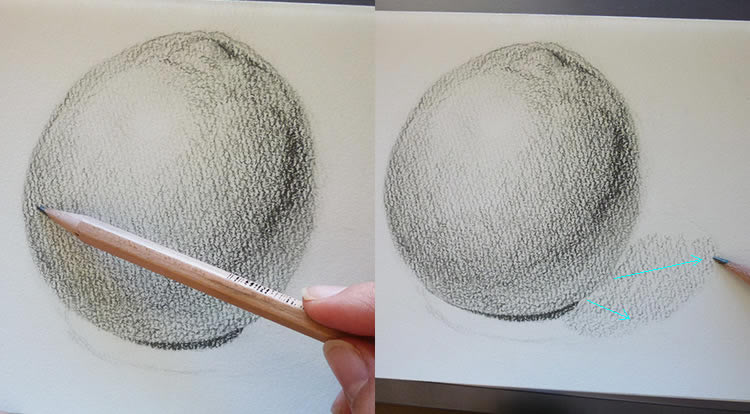
Use your finger gently smudge the Cast Shadow. Make your penile sharp and draw the edge of the orange, except the left top outline, as it is the area that the light comes from.
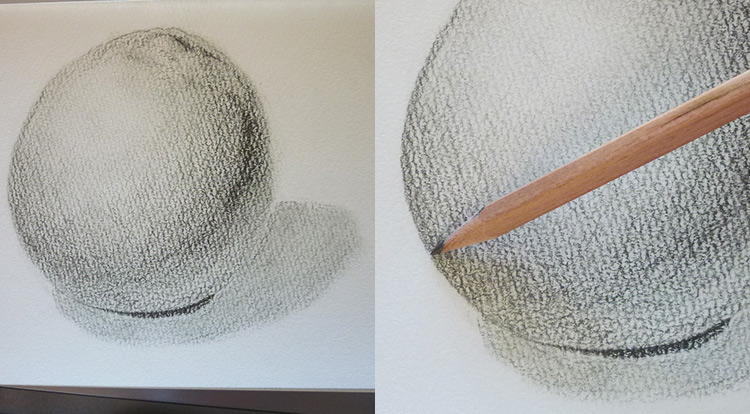
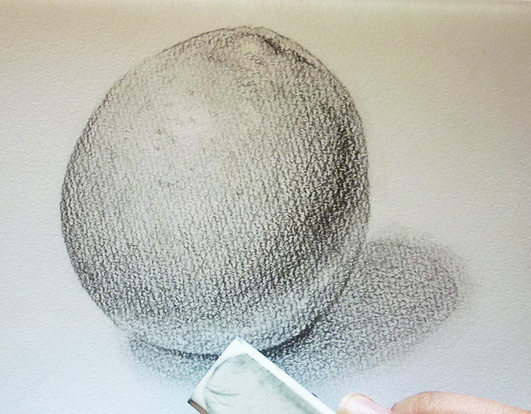
Get the eraser to clean the outside of the orange. After that, smudge the edge of the Cast Shadow.
Slightly draw back the edge of the Cast Shadow, also tone the bottom of the orange slightly darker, but keep the Reflected Light bright.
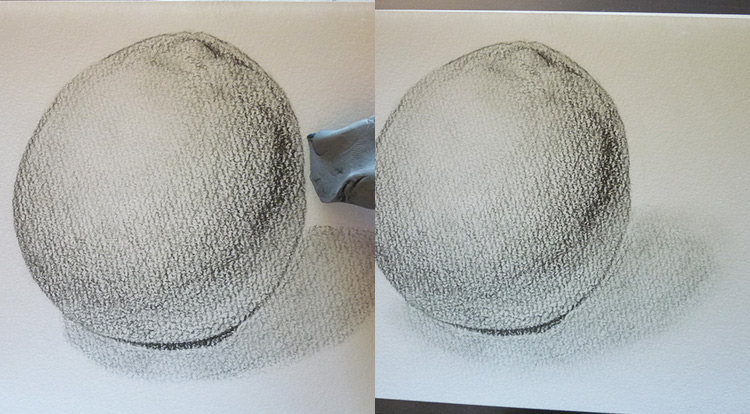
Ultimately, get a sharp corner of the eraser to point the spots which the highlight are to indicate as the Highlight.
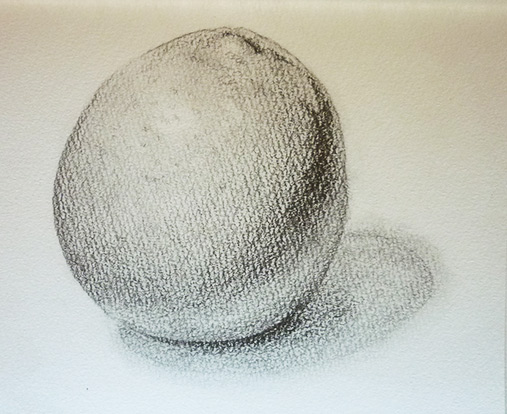
Switch to a HB pencil to draw some spots at the Highlight and the Core Light to indicate an unsmooth surface. Use the eraser slightly to remove Reflected Light at bottom of the orange.
Follow the curve and smudge the area of Reflected Light, make that area have smooth shading. At the very the end, use the 6B pencil to tone more dark at the darkest areas.
For the further details on shading, and how to use right tools to draw highlight and shadows, please see the How to draw light, shading and texture.
Understand material and texture
We see objects reflecting different highlights and shades, this is caused by their different materials. For instance picture-44 the left hand side with porcelain, it reflects its environment lights from different angle well. But the right hand side made of ceramic, it’s at the same environment, but it only reflects some small highlights.
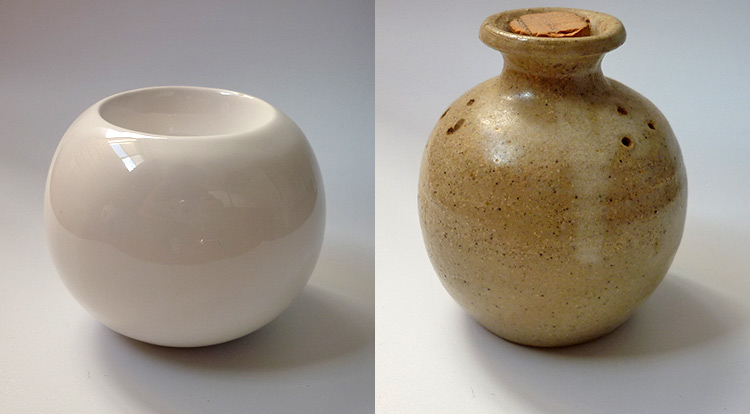
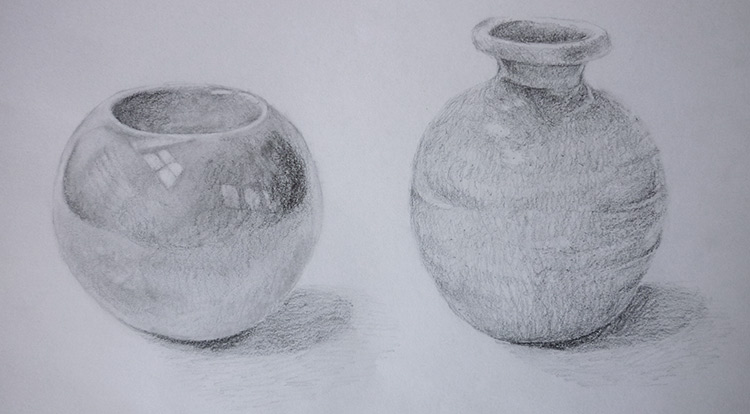
When we draw those two objects, for the porcelain one, we are able to use the smudging way to present its reflection and smooth surface. However, the ceramic one we probably won’t smudge on the shades too much, as it will make ceramic look too smooth.
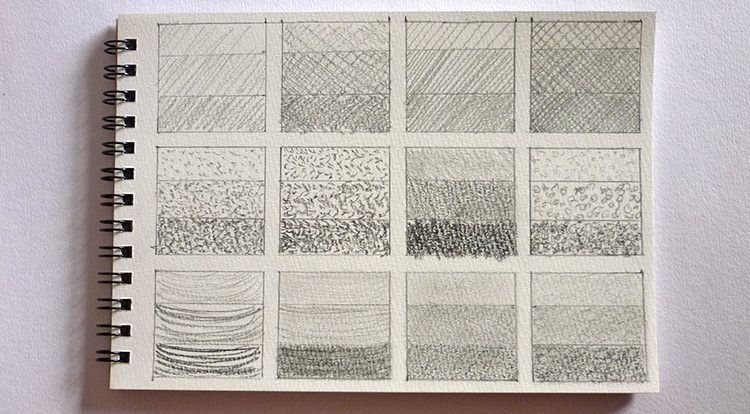
Practice 5-2: Develop shading style patterns
At this point, we are able to develop different patterns to present different materials. This is my solution, I hope it will help you to develop your drawing skills more. I prepared a sketch book, and drew some columns and rows on, to prepare for filling up with patterns which could be good for different materials.

When you are drawing different shading styles patterns, try to develop the core light, mid tone and core shadow. Once you have developed more in your texture library, it will be a good reference for your next drawing. If you would like to know how to use your shading style patterns on an object, please see 3-1 of the How to draw light, shading and texture.
For further details to draw textures on an object, and how to use right tools to draw, please see the How to draw light, shading and texture.
Payoff
It’s time for you to show what you know about drawing. See what you learned from this article, try to use all the 5 steps to draw a picture. Developing your artist skill, and enjoy your leisure time in drawing. When you finish your art work, please take a picture and send it to us. Share your great art work here with everyone.
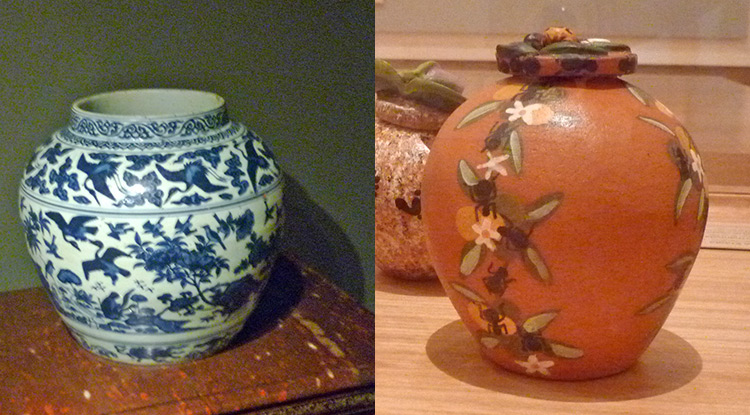
Draw these 3 pots with different material looking. See how you can place or relocate them at the positions you would like them to be. When you finish, don’t forget to take a picture and send it to us. Show your great art work to encourage everyone to draw.
Tips
The vanishing point is a point which you can always see on the horizontal line. This point will identify the eye level. Therefore, find the vanishing point from your drawing, it's good to help you to get the right perspective view.
hgf says:
Aw, this was an extremely nice post. Finding the time and actual effort to
make a superb article… but what can I say… I procrastinate a whole lot and never seem
to get anything done.
Content team says:
It’s great to hear that you like this post. I believe that you will get it done one day, keep it up.