Premise
From this article, we are going to use the right tools to draw details of the highlights and shadings. Also we are going to use your developing shading style patterns to draw it on an object. At the end, you will have an exercise to simulate a pattern with real shading.
YOU WILL NEED
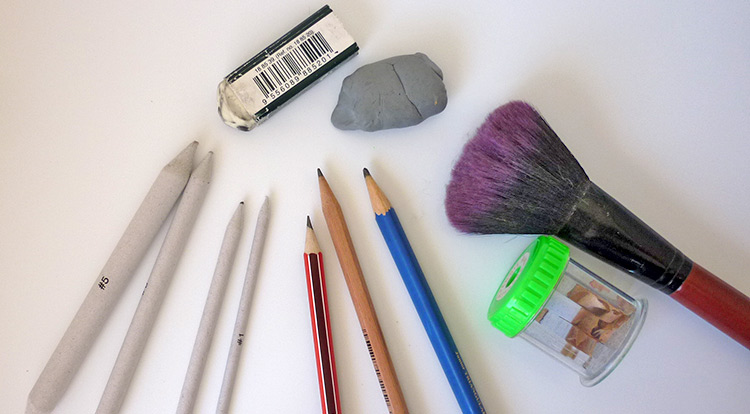
Pencil of graphite grading scale is just a suggestion below, please use it according to your personal preferences or existing materials.
- Drawing paper
- One HB pencil
- One 2B pencil
- One 6B pencil
- One eraser
- One knead-able eraser
- A set of drawing stump (#1, #2, #3, #5)
- A big brush
- A pencil sharpener
Practice
If you have already read the article 5 steps to start drawing, congratulations you are able to start this advanced lesson. If you haven’t, please have a look at it first, before you go any further.
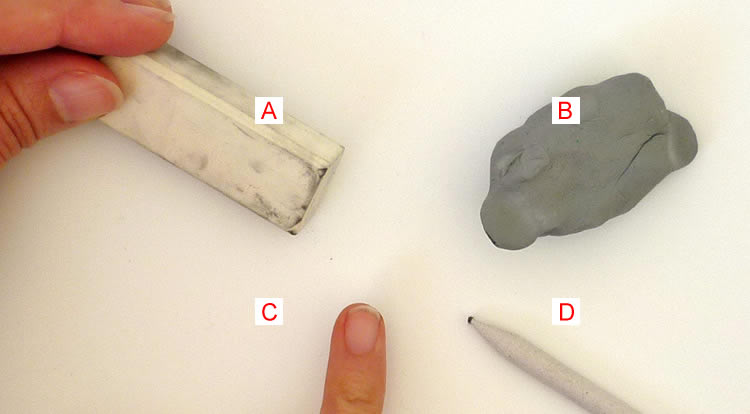
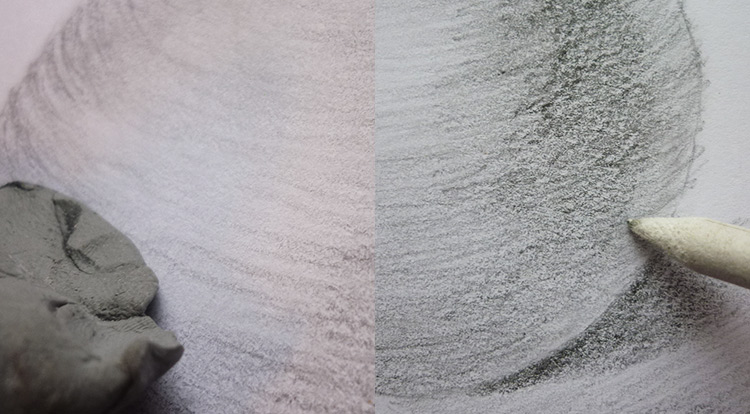
We are going to use some other tools to draw details of the highlights and shadings. Firstly, let us get some idea with the eraser (picture-1 A) and the knead-able eraser (picture-1 B). They both are able to remove shading and drawing, the different is the knead-able eraser is able to remove or add some soft transition between the light to shadow. The patterns you will remove depend on the shapes of the knead-able eraser, and how strong or gentle press it on the drawing.
About the smudging tool, picture-1 C and D are able to be used to develop the shading and tone. After you have drawn shades, if it’s a big area, you can use your finger. If it’s a small area, if you would like to work for small details, the drawing stump will be a good option. Especially when our fingers have been made black. A good thing about the drawing stumps (picture-1 D), is you can think of it as a kind of pen to blend sharpening with softening, make the pencil touch to fade out.
1. A simple example
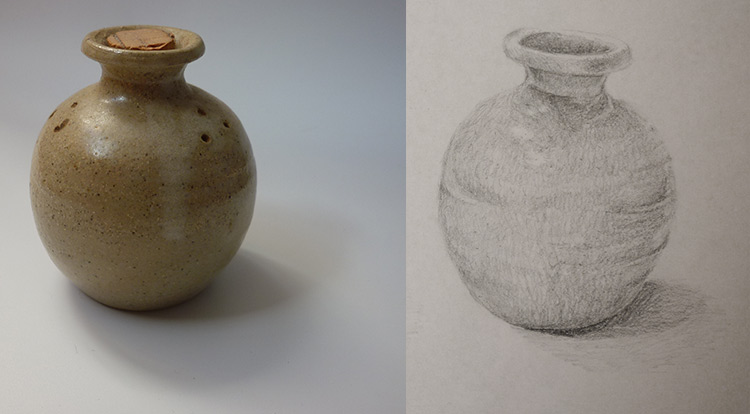
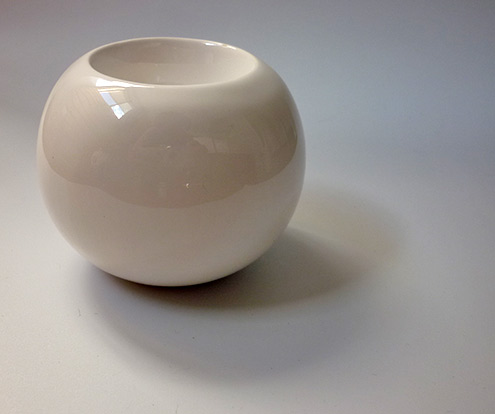
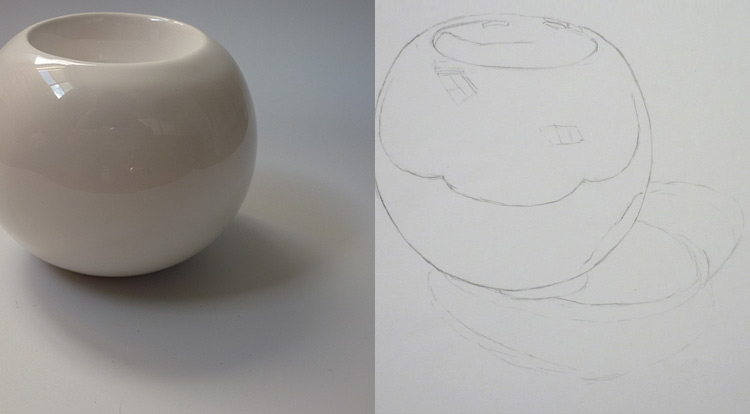
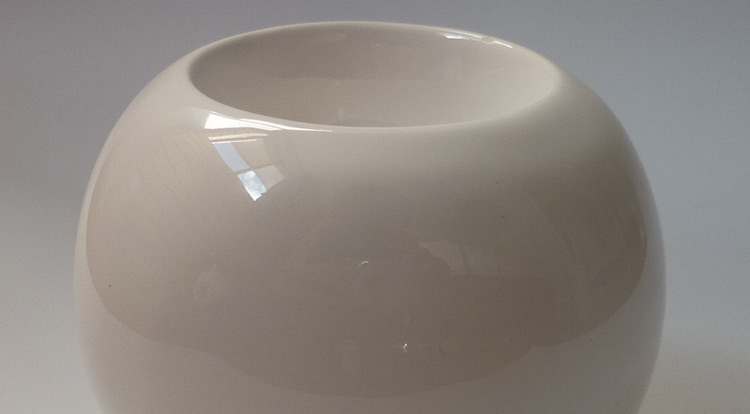
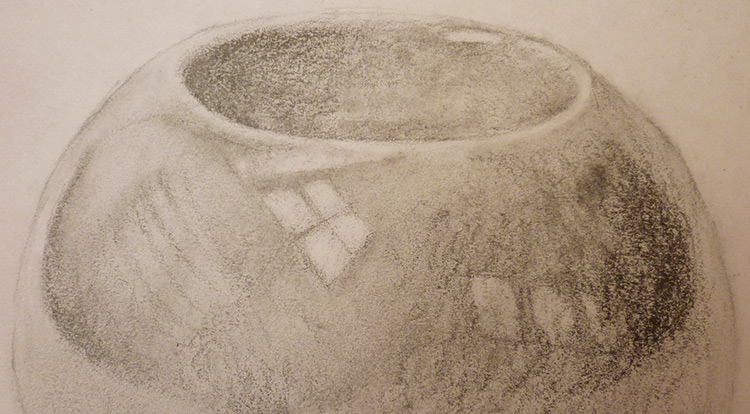
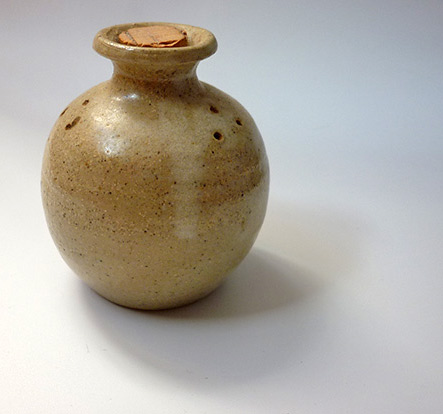
We are going to draw something made of porcelain, as it’s very reflective. It is a little bit more complex to draw it than the Practice 5-1: Draw shading and light from the 5 steps to start drawing.
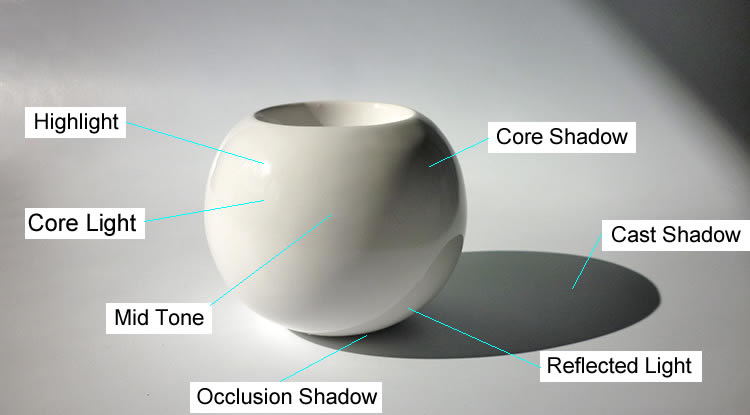
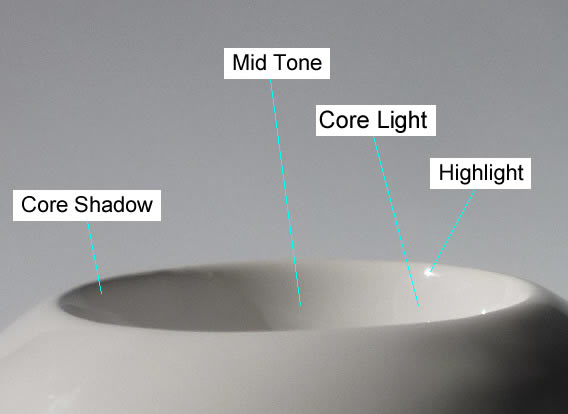
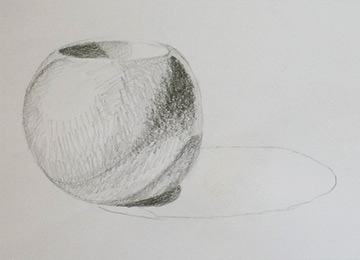
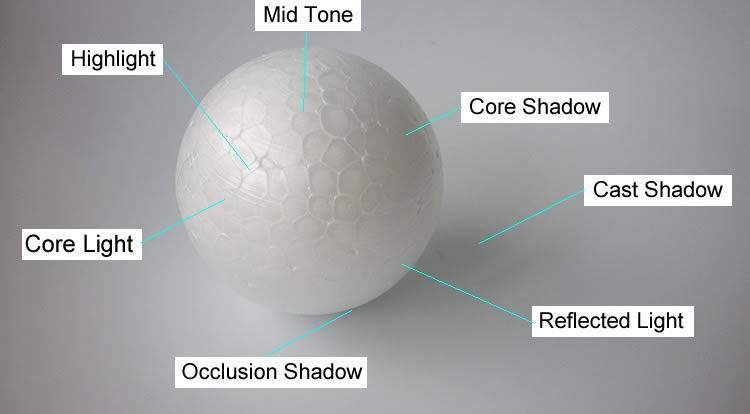
Picture-3 indicates the Highlight, Core light, Mid Tone and Core Shadow. For a good explanation, I am going to mention the name of the shadows as in picture-2 and picture-3. All lights and shading in both pictures must be drawn.
The Reflected Light has been reflected from the Cast Shadow at the right bottom of sphere, you are able to see a clear curve shape on it.

1-1 Sketch the object and tone shading
Sketch lines that divide the areas of the Core Light to the Core Shadow. In this case. Draw all possible lines you can see at this step.
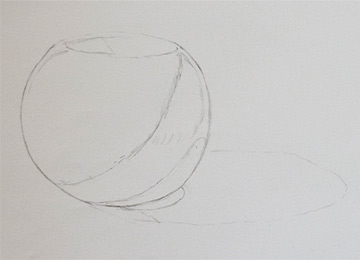
Tone darkly on the Core Shadow, also draw a clear shape of the Cast Shadow that reflects on the Reflected Light area on right bottom of the sphere. Tone a little bit lightly on the area between the Core Shadow to the Mid Tone.
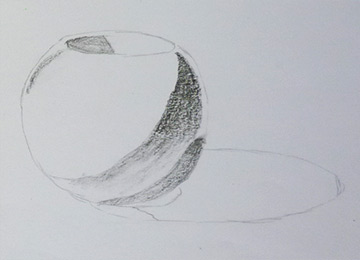
Gently tone the Mid Tone and the edge between the Core Light and the Core Shadow areas. The Mid Tone is the area for developing the look of a 3 dimensional sphere. As such, you are able to draw the edge of the circle a little bit darker than the center.

Tone the Core Shadow darker. Also extend the area of the Mid Tone, let it connect smoothly with the Core Light and the Core Shadow. Draw the Occlusion Shadow darkest, and erase a little bit off the Reflected Light.
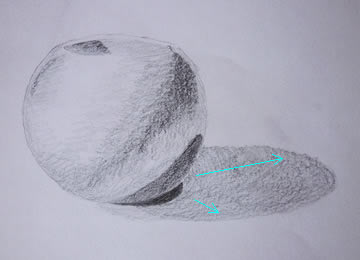
Draw the Cast Shadow with radial direction from the Occlusion Shadow toward to outside edge.
1-2 The simple tone and shade
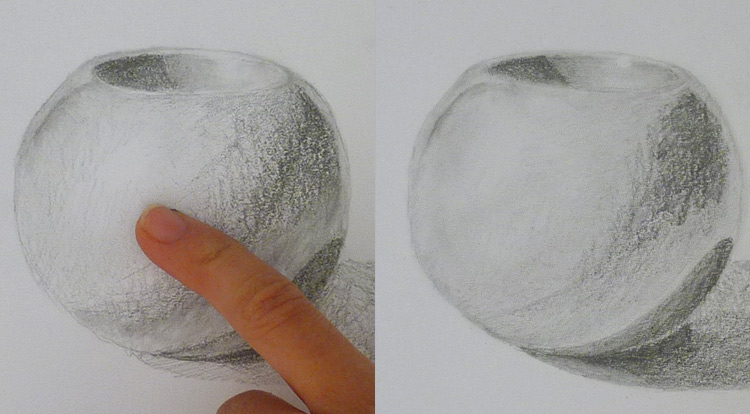
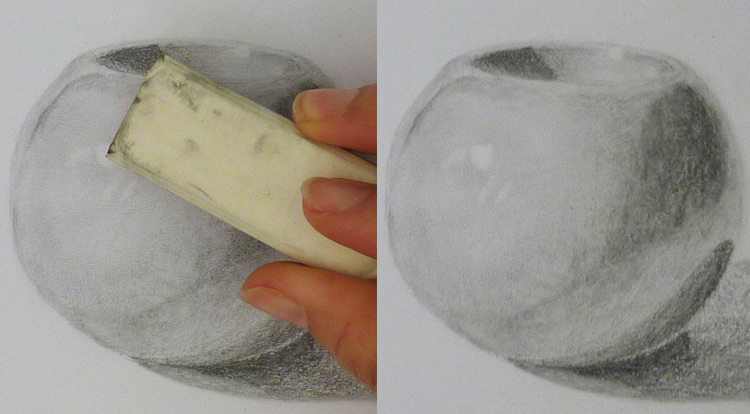
Use your small finger gently smudge between the Core Light to Mid Tone, and the area from the Mid Tone to the Core Shadow. When you smudge the pencil touches, the direction should try to follow the curve of object. Gradually smudge slowly to check from the scenery. Most of the time we are smudging the Mid Tone equally to get the smooth tone first. After smudged, tone gently shade back again, to make it look smooth.
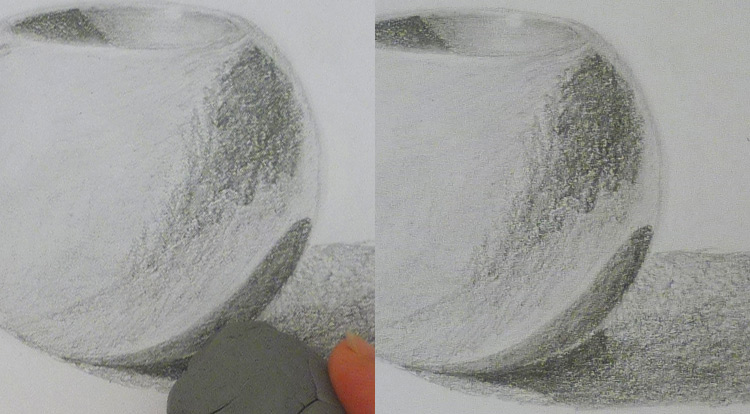
Gently smudge the area of Reflected Light, as it’s darkest shading is reflected from the Cast Shadow, but itself still has the bouncing light. Therefore, we can knead the knead-able eraser as a long and thin shape to remove gently a little bit of dark shading.
After the Cast Shadow has been toned, we have the clear sharp edge on it. Use the # 3 drawing stump to smudge its edge, but keep the inside of the Cast Shadow with its dark shadow mapping drawing.
Keep using your finger to gently smudge the areas of the Mid Tone till you can’t see the pencil touch. Keep toning all shades smoothly. After that, swap to 6B pencil to tone as dark as you can on the Cast Shadow and the Occlusion Shadow.

1-3 The simple light process
After you have done the shading and checked all the shadows correctly, we are able to establish the highlights. Clean your eraser, get a sharp corner of the eraser to point the spot which the highlight is to indicate as the Highlight.
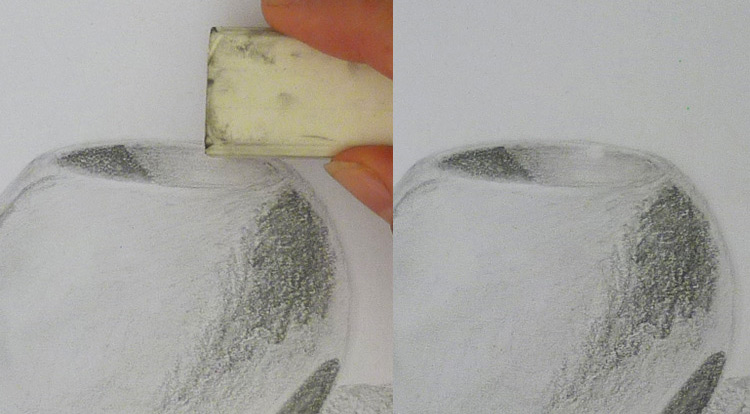
You might not correctly point at the right spot or right size of highlights with eraser. If it has removed too much or the shape isn’t correct. Try to use the drawing stump #1 – #2 to smudge back shading and do it again.
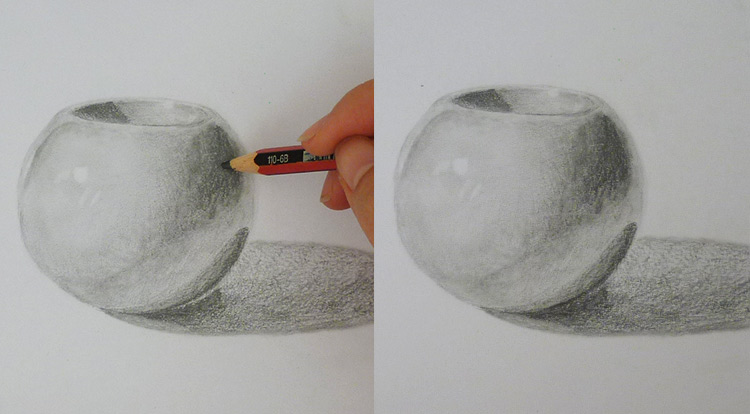
Finally use 6B pencil to tone the darkest on the areas of the Core Shadow. As such, we are able to make the strong light and dark contrast on your drawing.
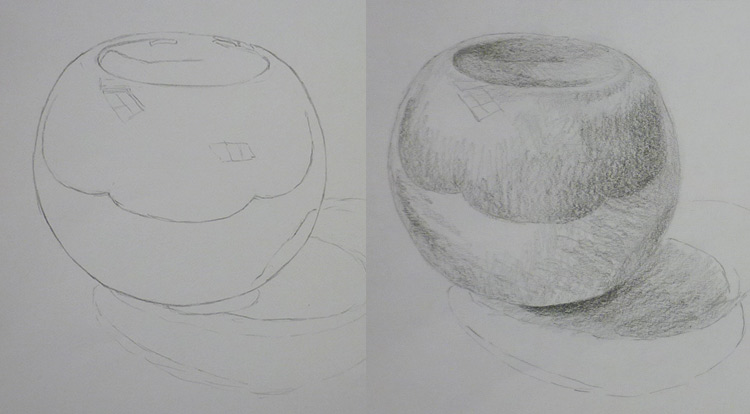
2. An advanced lights and shades
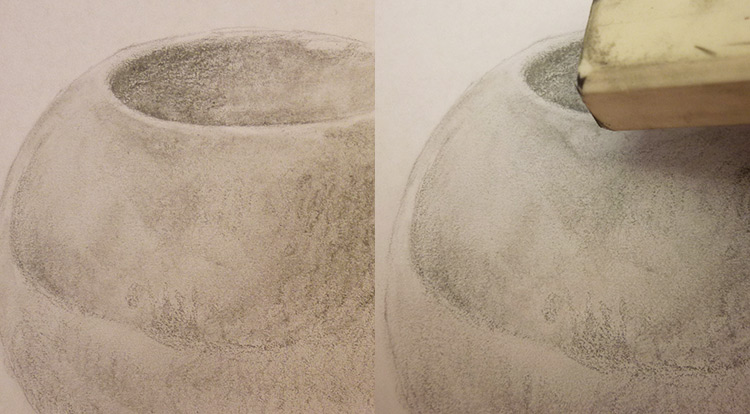
As picture-10 we are going to process the same sphere, but it’s been placed at an environment with double light directions, also reflection with windows and other elements surrounding it. At this point of view, we can see two obvious Cash Shadows, and a couple of Highlights with rectangle shapes on it, let’s draw them.
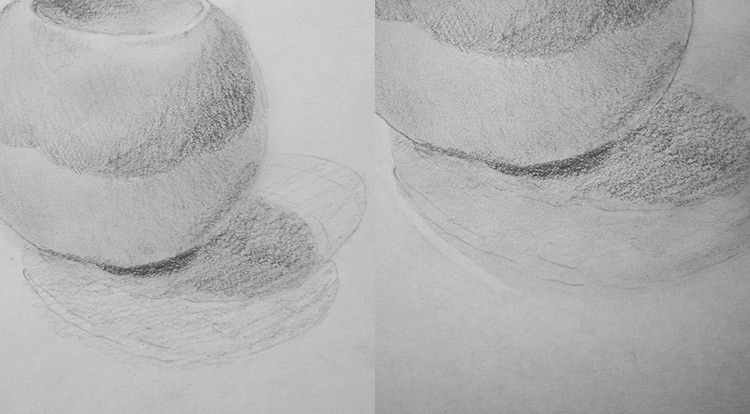
2-1 Process shade
Please follow picture-5 to picture-9 for seeing details, sketch the object and draw all possible shapes and lines that you can see from sphere scenery. Tone the Core Shadow and Cast Shadow, also gently tone the Mid Tone areas.
While you are smudging the shading, follow the curve of the object to establish its blending. Smudge on the areas of the Mid Tone till you can’t see the pencil touch from it.
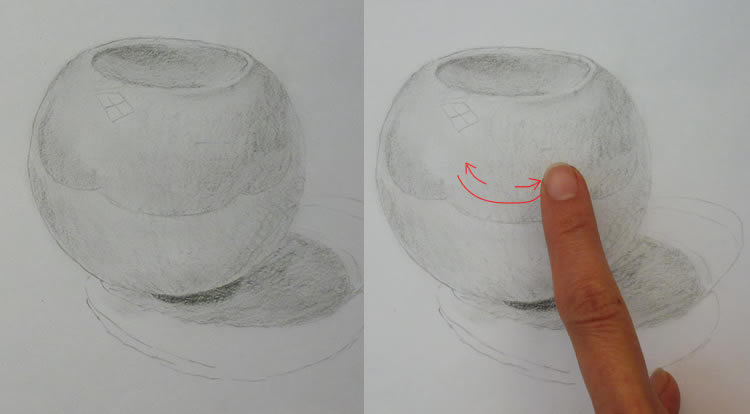
After smudging the entire object, tone the areas of Mid Tone and Core Shadow again to make the shading look smooth. The areas which we are going to draw the highlight, tone darker a little bit. As such, we are able to work for the contrast with the Core Light and shapes of highlight. Consequently, smudge a second time on the area of the Mid Tone again to indicate smooth shading.
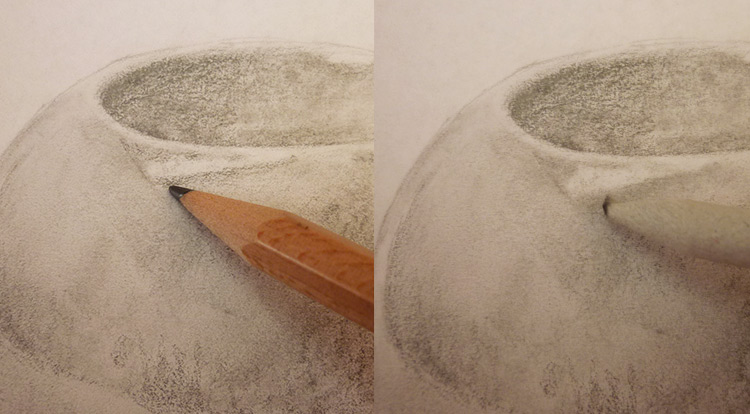
2-1 Multiple shadows
When you sketch the areas of Cast Shadows, try to draw it lightly. According to the soft light direction, the sphere has two soft shadows. Therefore, if we draw it lightly, we don’t need to remove the sketch later.
Tone the intersection of the Cast Shadow darker, and tone these two Cast Shadows lightly. If you have clear pencil drawing on Cast Shadows, remove it at this moment. Following, we smudge these two Cast Shadows and make it go out slightly. About the edge of the Cast Shadows, use drawing stump #3 to blend it out.
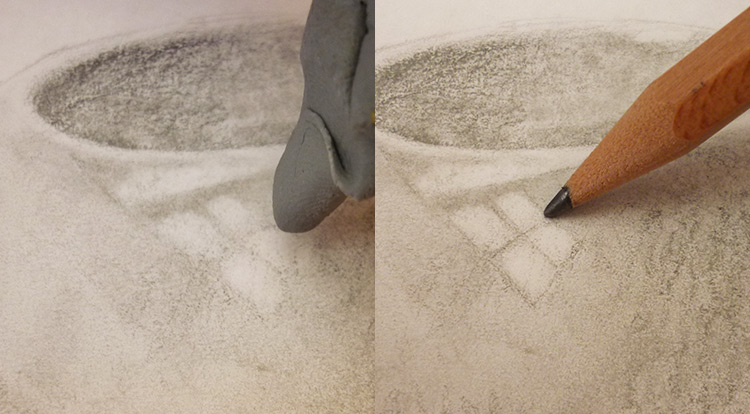
Use the drawing stump #3 or #5 to smudge the edge of the Occlusion Shadow. About the light tone area of the Cast Shadows, you are able to use the knead-able eraser to establish some patterns gently. Make it look more interesting.
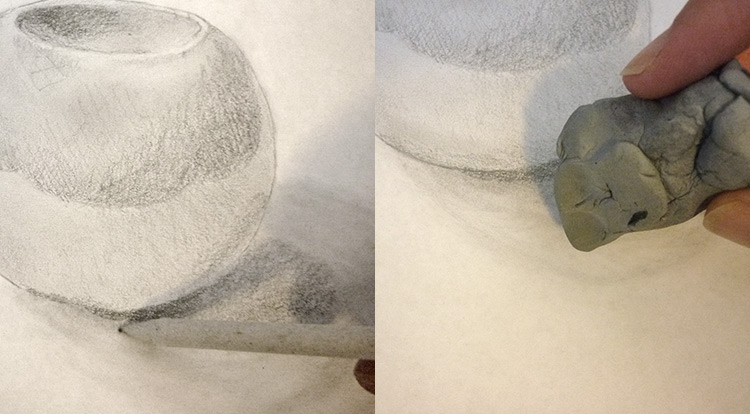
Swap to 6B pencil to tone the intersection of the Cast Shadow darker again. Also knead the knead-able eraser a small point to dip a couple of times on the area which you just toned. Make it look like it is having some reflection on it.
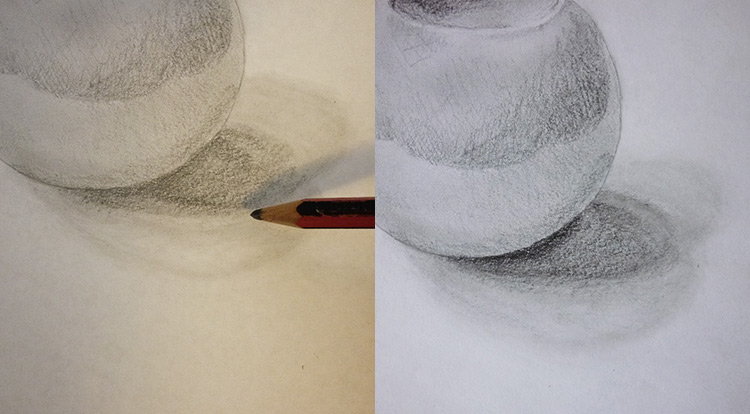
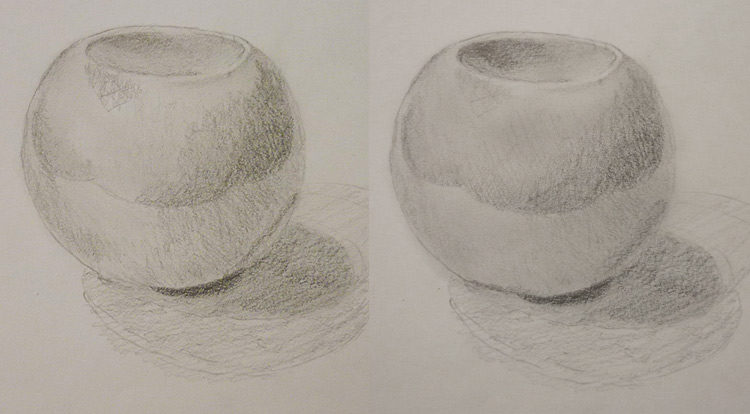
2-3 Multiple Highlights processing
Ultimately you have done the shading, let us start processing the highlights. I am going to show you how I process the highlight as the left top shapes of the windows from the example. As such you are able to use the same solution to work on other highlight.
Smudge well the area which you are going to add Highlight to. Clean your eraser, make sure it has no black rubber that had remained from before. Get a point corner of the eraser to work a shape at the top curve of the sphere.
Once the shape has removed the tone by the eraser, use a 2B pencil to draw gently a shape on it. Consequently use the drawing stump #2 to smudge off the edge between the Core Light and Highlight, make the tones look smooth.
Do the same thing for the four shapes of the rectangles. This time we try to use the knead-able eraser as the shapes are really small. To follow, use a 2B pencil to draw gently the shapes as a right rectangle.
Use the drawing stump #1 or #2 to smudge off the pencil touch, make sure the tone is connecting smooth with the Core Light.
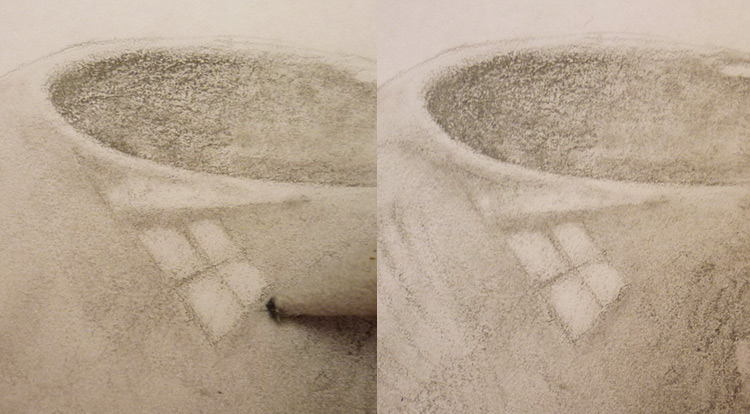
Once you have the solution for processing the Highlight, practice a couple of times to develop your own way. Also finish the other reflections of Highlight shapes on the elements. At the end, tone darkest on the areas of the Core Shadow to get good light and dark contrast.
3. Texture
From the 5 steps to start drawing of the Practice 5-2: Develop shading style patterns, we had developed some 2D shading patterns. At this section, we are going to use it on a 3D object.
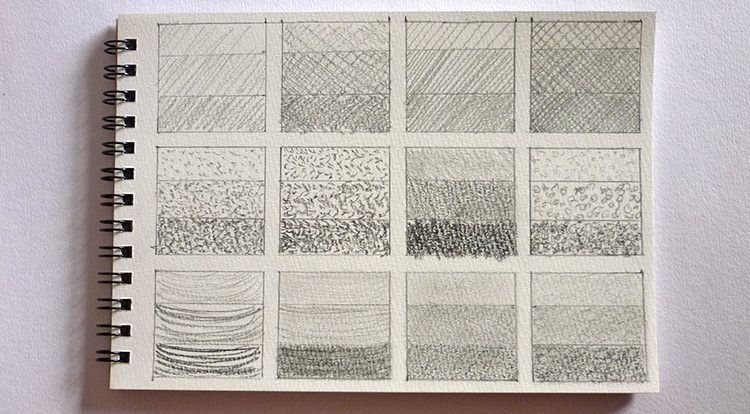
3-1 Use your shading style patterns on an object
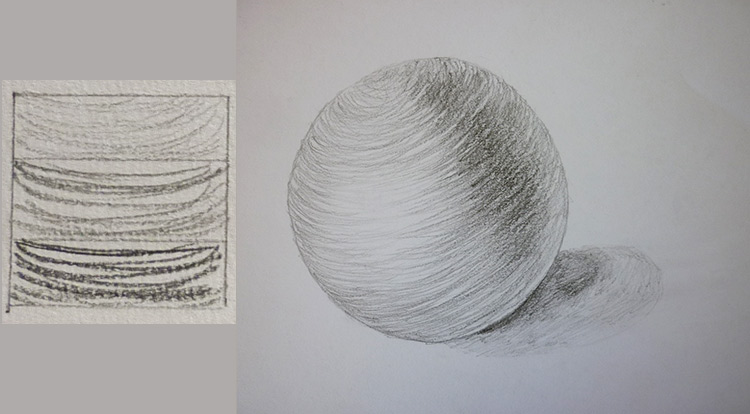
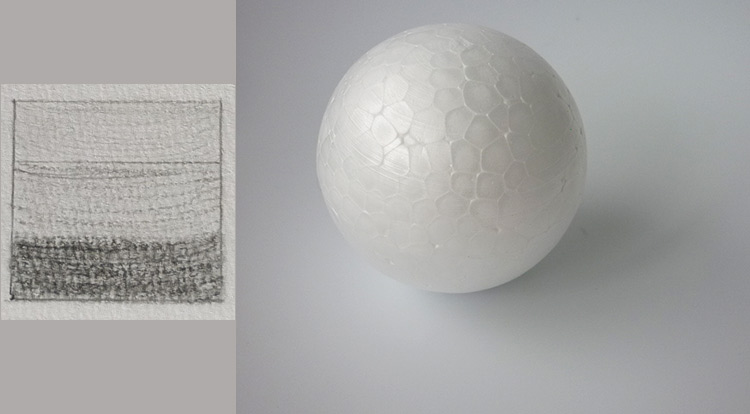
Choose one pattern from your collection of the shading style patterns (See Practice 5-2: Develop shading style patterns from 5 steps to start drawing), also find an object from the scenery to match the shape that you would like to draw. If you are going to draw a ball to look like the picture-26, reference its shading to help you estimate the lights and shadows. Here is an example to show you what I have done with the method.

Estimating the shading from the scenery to establish the Core Light, Mid Tone and Core Shadow on your simulating object. It’s a really good way to train your eye to see more realistically, also it is a good way to learn the shading.
While we are drawing, we will meet lots of situations in the future that some objects are not placed at the good spot as our design position on our picture. You will need to relocate it and use the skill which you are going to learn here to indicate the correct shading for the new object from relocation.
Here is another example to use a pattern from the shading style patterns. Have you noticed it? It’s not smudged on the object. You are able to see clearly the pencil touch on it. In fact, if you would like to draw that string pattern shading, you have to draw lots times to establish the mapping shading.
Practice 3-1: Draw a sphere with texture
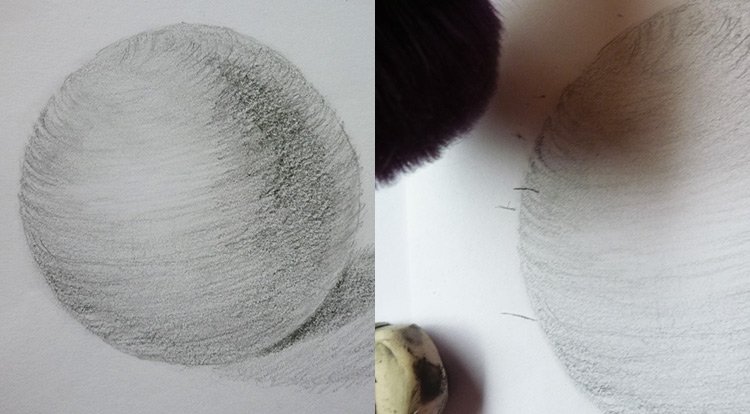
We are going to draw a ball with a pattern as in picture-28 left hand side, and try to indicate the light and shadow from picture-28 right hand side.
Sketch the outlines and tone the Core Shadow, Mid Tone, and Core Light. Also work on the Cast Shadow and tone gently on the Reflected Light. After that we smudge the shading to make it look smooth.
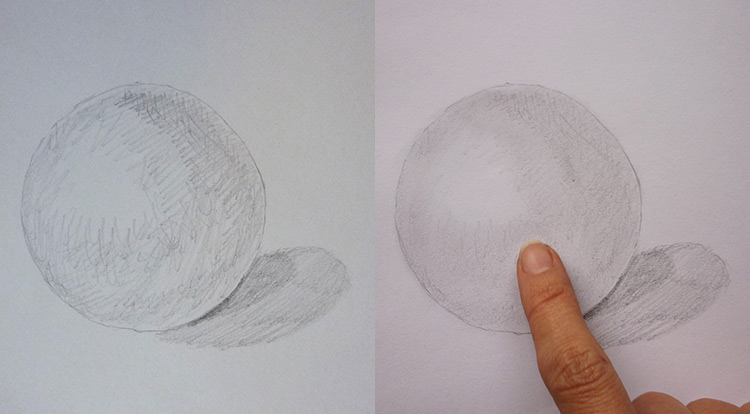
Draw the pencil touch pattern as the picture-28 left hand side on the sphere. Get the indication of the light and the shading from picture-28 right hand side to establish the Mid Tone and Core Shadow correctly. Draw darkly on the Core Shadow and Cast Shadow.
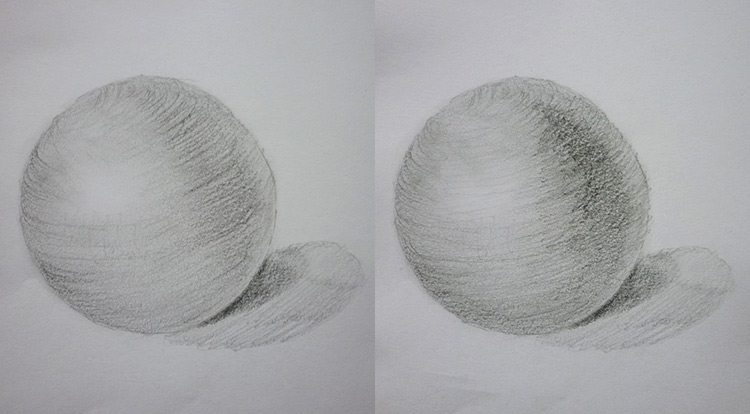
About the Highlight, we are able to use the knead-able eraser, make it as narrow and long as you can to remove the Core Light area as the fine lines and scratched shape. In addition, use the drawing stump #1 to smudge the Reflected Light gently to keep some fine line, let the pencil touch fine lines still be able to be seen.
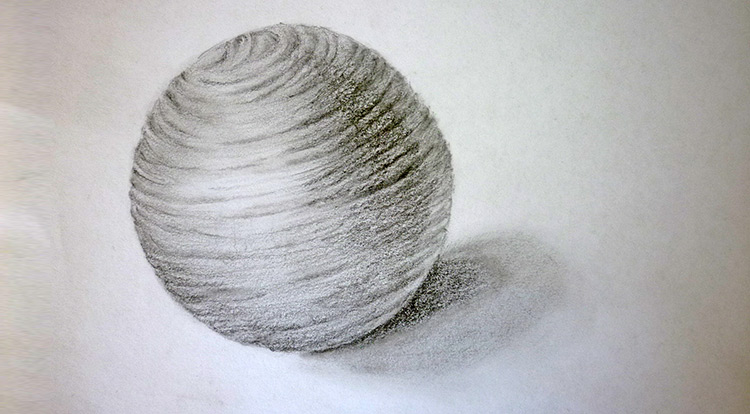
About the outline of the ball, draw a little bit of a non-smooth shape to simulate the string lines that surround it. If you are not going to draw the background, use the eraser to clean outside of the sphere. When you remove any drawing by eraser, it is strongly recommend you to use the brush to remove the rubber instead of using your hand. As such, it can keep your drawing nice and clean.
Consequently smudge a little bit of shading and draw back the string pattern. Check the indication from the reference again to establish the correct light and shadow. Keep repeating these steps to make the shading as real looking as possible. Finally, it should look like the string lines surrounding on a sphere.
Payoff
It’s time for you to show what you have learned from this article. Here I have prepared an exercise for you. You are more than welcome to find yourself one to draw. Draw correct materials with highlights, core light, mid tone core shadow and cast shadow.

When you finish your art work, please take a picture of your drawing and your reference photo, then send it to us. Share your great art work here with everyone.